Nativity Blocks Tutorial
When I saw a wooden set of Nativity Blocks, I knew I had to have a set for the boys!
1 x 3 of lumber
Creative Memories Nativity Stickers
Color copy of stickers
Mod Podge Medium or homemade version
Scissors
Pencil
Ruler
Jig Saw
Electric Sander or dremel tool
Sandpaper
Wood stain
Sponge brushes
Something to protect your work surface
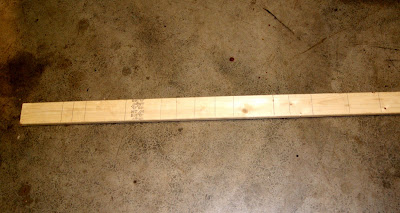
I first made color copies of the stickers which I would be using, so that I could cut them out, and lay them out on my 1x3 of lumber, to see how long each section needed to be.
I didn't not use exact lengths, but instead used the color copy of the sticker to tell me how long each block needed to be.
I used a ruler and pencil to mark where the cut would be made.
My 1x3 of lumber, with pencil lines, ready to be cut.
I then asked my dear husband to cut the wood.
He put the plank into a vice to stable the wood, so that the jig saw would not move during the cutting process.
We ended up with 15 blocks, with plenty of wood left over!

Once the small sections were cut, my dear husband used a hand held dremel tool to sand the ends to a smooth finish.

I then used fine grit sand paper to smooth the long sides, to a slight rounded edge.
I gathered my card board, stain, screw driver, and brushes.

I opened the can of Minwax stain, with the screw driver and laid out the card board to protect my garage floor.(My cheapo sponge brushes, gave lots of fine splatter, I am so happy I used something under my work space!)
I love the way the satin warmed the surface of the wood block, after waiting for it to dry per the stains instructions.

I then found a glass jar and white school glue to make the homemade version of mod podge!(With the back to school sales...I made my home made version for 40 cents, verse the normal container that can cost $6.)

I then applied a coat of my medium to the surface the block, applied the sticker, smoothed the surface, and applied another layer of medium on top of the sticker.
 (Not sure if it was my homemade version, but I had to do several coats of the medium to get the "seal" I was looking for.)
I love how they turned out! I can't wait to surprise the kids at Christmas!

Notes:
1. I will be using a varnish to finish and seal these blocks.
2. The CM Nativity stickers are smaller than I would have liked, but I had them in my scrapbook stash, and used them after hitting several craft stores. (wrong season to find the stickers)
3. I have purchased a clear paint bucket container to store them in, and I will decorate it with ribbon, and a sticker that says the "Reason for the Season!"
4. Sorry, for the dark photographs. I tend to work on my crafts late at night, after the boys are in bed! (I know you Momma's understand!)
Thanks and good luck!
 The completed clear paint can and label, "Jesus is the Reason for the Season."
 The finished project, under our tree!


What a great project. I think I am going to be making these for the girls.
ReplyDelete